Monday, October 17, 2016

It's Been Forever!


I am clearly the worst blogger that has ever been, as it has been literally YEARS since my last post, but I'm bursting with crafty and pretty that I want to share. Let's start with my latest endeavor, fiber dyeing, with a special focus on foraged natural dyestuffs.

While I make my home in the Urban Jungle that is NYC, my mom lives out in suburban NJ, with a fairly wildlife heavy piece of property. Deer, foxes, groundhogs...and then there's all the flora that is just begging to be used as dye.


What brought this on? Well, also in the vicinity of where my mother lives is an alpaca farm. Once I caught wind of this, I immediately emailed the owners to inquire about purchasing some of their fluffy deliciousness. Instead, they informed me that they sell the animals, but have no use for the fiber and I could have all I wanted. Wha???!! So, I arranged to meet them, frolicked with the alpacas, and walked away with a full alpaca blanket (fleece). I found a mill, sent it in for processing, and a couple of months later had a giant box containing 16 lbs of cream colored alpaca roving show up at my door. And while creamy alpaca is lovely, hand dyed alpaca is even more glorious!


My first endeavor involved wild Goldenrod that I collected from a field across the street from Mom's place. I tried to be respectful of the many lazy bumblebees, slightly more terrifying wasps, and other varied and unique insects that found it as attractive as I did. In the end, I gathered about 16 oz of flowers, laid them out to dry in the sun for a couple of days, then brought them back to my tiny apartment.


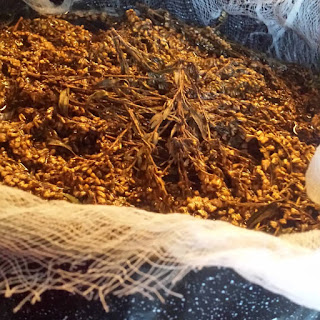
Following instructions from an old dye book, I soaked 8 oz of fiber in an alum mordant overnight, to encourage the color to absorb properly. The next morning, the fiber was removed and I started a dye bath with the flowers. I allowed them to boil for a full hour, the cool until that evening.


At this point, the water was a lovely mustardy color, though looked browner than I had hoped. But there was nothing to fear! I strained out the flowers, added the mordanted alpaca, and slowly brought it to a simmer. I allowed it to sit at a simmer for about an hour, then turned off the hear and left the fiber overnight.


The next day, I removed the alpaca and gave it a rinse...and oh my goodness! Aside from there being no dye in the rinse water, the fiber was a beautiful, sunny shade of yellow. Success!


And now, I am officially addicted to foraging for dyestuffs.  I will share some of my other dye experiences, including Pokeberry, Black Walnut, and my next planned project, Birch Leaves.

I shall have the prettiest of all of the knitwear once the Zombie Apocalypse wipes out civilization as we know it. ;-)


Wednesday, August 15, 2012

joyful fermentation

it all started with a Mr. Beer kit. initially, i got one for my brother for christmas, as he is very into the whole small batch handcrafted beer scene. and, apparently, i was right on track, as he has already gotten a kit from another company. but, 'more beer to be brewed' was his response to having an additional kit.

a few months after that, i noticed a Mr. Beer kit showed up cheap on Woot.com, so i thought, 'what the heck, i like making things, maybe i'll like making beer! i mean, i like beer...' and it seems that was just the beginning.

kenny approves of mr. beer

i opted to get fancy with the ingredients, adding a generous amount of fresh ginger to the pale ale mix. i followed the instructions, poured it all in the fermenter and waited. it took 2 weeks to brew, then i bottled with sugar to carbonate and waited another 2 weeks. i was amazed: i had made beer! and the more time i allowed it to condition, the better it got. amazing! fizzy and wheaty and delicious.

frogged, indeed.
however, never one to simply let it go and do what a kit says, i decided i needed to figure out how to brew from scratch. the forums i visited were intimidating, with all sorts of unfamiliar ingredients and percentages. so i decided to start simple, and make some hard cider. after all, cider will go hard on it's own, so how hard could it be to manipulate the process myself? to the internet! i easily found sources for airlocks and bungs, the most basic thing you need to brew. basically, the airlock allows the CO2 to escape the bottle during fermentation while keeping things nice and sanitary. i found a great deal on champagne yeast and yeast nutrient. and that's about all you need for cider, aside from the cider itself.


i started with a 1 gallon bottle of unfiltered apple juice from Whole Foods, which provided not only the base, but also a carboy to do the fermenting in. and while the yield would be slightly less than a gallon, since i needed to pour some off for headspace, i figured it was a good start. i pitched about 1/4 tsp of yeast and 1/2 tsp of nutrient, put in the airlock and let it brew for 3 weeks, until the fermentation slowed down. then i syphoned into a secondary bottle (which i ultimately found at a wine supply shop near my mom's house that i had somehow never noticed before. now, i know.), and finally bottled with 1 tbs of corn sugar per bottle (known as 'dextrose', available in some health food stores and well as brewing shops). after 2 weeks of conditioning in the fridge, i opened a bottle. it was clear and bubbly and very dry. it was hard cider!

call me Perry

i was inspired. more beverages followed: a hard ginger ale, strawberry wine, mead, and, currently, a ginger infused perry (pear cider). in the meantime, i reconnected to some friends who had just moved back to the neighborhood, the husband half od which has been homebrewing since he was a teenager (shhh...don't tell!). he has a pretty impressive beer brewing setup, including a 2 tap kegerator, and often brews 10 gallons at a time. he has become my mentor in all of this, which has been pretty great. oh, and his wife doesn't lose out, as she is of the crafty variety so when i visit, there is much talk of yarn and spinning and stitching and baking. she once jokingly said during a vist where he and i were engrossed in a conversation about grains and malting, 'erik? it's MY turn to play with liz!' golly, i'm glad they moved back!

just wait until Christmas!

so the adventure continues. i'm looking to try an all grain batch of beer, and have sniffed out more homebrewing supply sources in the city as well as online. the funny thing is, i'm not really a huge drinker. as a result, my fridge is filling up with libations that my friends are happy to take off my hands at parties. it's no different than baking, as i see it. i mean, i won't eat a whole cake by myself, so it's natural for it to be made to share. i see brewing the same way, it's just something else that i can offer as housewarming or holiday or engagement gifts. so raise a homemade glass to giving! i think even the simplest acts of generosity makes our world a happier and kinder place.

Tuesday, June 19, 2012

Figment Update!

so, i actually managed to make all of those flowers for my Figment garden! the only sad part was, as a result of some unmonitored concert  goers the evening following the first day, about 12 of my flowers went missing overnight. sad, but i supposer flattering in a way, as it was the ones that i thought turned out the best that disappeared. happily, i got some good pictures the day before. here they are!


now, on to the next project!

Monday, May 14, 2012

artful repurposing


a few years ago, a friend of mine asked me to co-design a minigolf hole for an art exhibit on Governor's Island here in NYC. it was part of the Figment festival, a weekend-long (and, for some pieces, summer-long) art exhibit that featured local artists and musicians who contributed anything from massive outdoor sculptures to tiny indoor paintings, participatory theatre to mini dance parties. it's grown to be a pretty amazing event and i was thrilled that our minigolf hole, called 'tillie', was there for 3 full seasons (and even showed up in time out NY and the NY Times!).

tillie in all his glory

however, after 3 years of summer long battering by the elements, my collaborator and i decided that tillie should retire. we had no plans for a mini golf hole this year, but i really wanted to contribute to the festival. the curators really love projects that are environmentally oriented, as well as interactive, and it got me thinking...what could i create on my own that would perhaps use repurposed materials in a unique way? what i came up with was a 'community garden' (the title of my piece), in which all fo the flora and fauna were created from repurposed shopping bags, most of which was converted into plarn. what is plarn? plastic yarn. allow me to explain.


making plarn involves cutting plastic shopping bags into loops, linking them together, and, if you're really ambitious, spinning it on a drop spindle or spinning wheel. then it can be used as you would any yarn to make things like bags, flowers, baskets...anything that likes to have a little structure. it can be a bit fussy to work with at first, as it has no give, but once you get a feel for it it's easy. and goodness knows there are plenty of plastic bags to be had! i put out a call to friends and was overwhelmed with the response.


pre-cutting
snip, snip!
loop-a-rama!
aaaand...plarn! spun and unspun.


 the only problem is the colors tend to be limited...mostly white, yellow, and tan. but i did luck out and find a few interesting colors in the stash next to the fridge....some blue, black, the rare and precious pink or orange. i tried to focus on flowers that used the colors i have the most of, like lilies, sunflowers, and daffodils. the few pinks and reds were used tissue paper flower-style to make peonies. green soda bottles have been serving as flowers and bases.

lily

a rare blue plarn orchid

kindergarten style peony. hey, it works!

i still have a long way to go, plus have included as part of the installation a plarn workshop offered throughout the day to show not only how to make it, but how to crochet a plastic shopping bag to be used again and again. i'm a bit overwhelmed (what have i gotten myself into???!), but excited at the same time. and so grateful to live in a city that offers such wonderful opportunities for artists to express themselves. now,  i'm off to design a crocheted daffodil...

i'll just keep these loops safe for you. don't wanna be the victim of a plarn bandit. you're welcome.

Monday, May 7, 2012

work and play

i've mentioned before that, where i work, we often can't wait to finish sewing so we can start sewing...in the sense that, after we've finished building a new show, cranking out costumes and hats and heaven knows what else, we all get very excited for the chance to work on our own projects. for example, we just finished building 2 shows, one on top of the other. it was very challenging and frustrating at times, but they are now out the door and we have a couple of days to relax. which, in the case of my coworkers as well as myself, means honing our skills on the sewing projects we've been dreaming of.


i'm a big fan of vintage dresses and have accumulated quite a few patterns over the years. the one pictured above is a favorite, for several reasons...not the least of which being that, including front and back facings, there are only 6 pattern pieces. sweet! i also recently unearthed some yardage of a great vintage style print, more than enough to make the dress. so that's what i did today.


mine is a bit shorter, and i modified the neckline, but in the end i was very pleased with the result. i considered a number of different trims for it, but didn't want it to be too precious. then i started experimenting with some of the leftover fabric, and came up with this:


flowers! they're hard to see here, but they're basically ragged looking roses, made from severals layers of fabric cut from a template. i based it on one that Clover has put out that i couldn't justify buying because, well, the pieces were just cardstock that was printed with directions. i could see from the packaging how it worked and set about making my own version.


the templates were created by folding a square of cardstock or heavy craft paper in half, half again, and half again, then cutting a curve around the edge and a circle in the center. this created an 8 petal template. i made 3 sizes for layering.


next, you want to cut a piece of fabric about the size of your template.


fold it in half along your first fold line.


then fold in half and half again, as you did when cutting the original template. and please ignore the dye under my fingernails. oh, the fashion sacrifices we make when we're crafty...!


cut the fabric around the curve...


and open! you now have a flower shape.


now, keep cutting! i made 4 large, 2 medium and one small to make a basic flower.


stitch an 'X' in the middle using a sturdy thread and pull it snug. the flower will pucker a bit.


flip it over and stitch through from side to side several times, just to pull the base into more of a pucker. alternatively, you can do a circle with a running stitch that's about 1/2" in radius and pull it tight.


the back will now have a little cluster that will give the flower some shape.


fluff out the petals, hit them with some steam and voila! you have a clever little rag flower! attach a pin back or sew it directly to a bag, pillow, sweater...whatever you like. it's a great way to use up scrap fabric and may well be my new favorite thing in the craft world. enjoy!

Sunday, April 15, 2012

getting to the greek


old cemetery down the street from me in Astoria, Queens


i love living in New York. more specifically, i love living in an outer borough that has not yet succumbed to becoming overly hip (though the increase in trendy restaurants along Ditmars blvd is a bit concerning).  when i first moved to Astoria some 15 years ago, it was mostly Greek families and working class Queens folks. many of the shop windows had signs exclusively in Greek. i was utterly enchanted. as the years have gone by, a lot of things have changed, from the Starbucks on the corner to the 7-11 and Subway by the train entrance. however, there are still many wonderful European markets catering to the somewhat dwindling but still present Mediterranean population. the best part of this for me is, as a foodie and avid cook, the many traditional food items that show up seasonally at the markets around me. i've seen uncured olives, fresh dates, dandelion greens (both sweet and bitter), and, most recently, green almonds.


every day as i walked to the train, i saw these piled up at the organic market at the foot of the subway stairs (this stretch of the N/Q line is above ground). i had also seen them in the local supermarket in a big basket in the produce section. unfortunately, i kept forgetting to look into how they were used as i have a bit of a walk home every day and would think of a million other things before my keys were in the front door. at last, in a moment of determination one morning, i turned to my smartphone to answer my questions as i waited for my train to leave. here is what Wikipedia told me:

"The almond (Prunus dulcissyn. Prunus amygdalus Batsch., Amygdalus communis L., Amygdalus dulcis Mill.), is a species of tree native to the Middle East and South Asia. Almond is also the name of the edible and widely cultivated seed of this tree. Within the genus Prunus, it is classified with the peach in the subgenus Amygdalus, distinguished from the other subgenera by the corrugated shell (endocarp) surrounding the seed."


what an 'ah-ha!' moment! i learned last year, thanks to a DIY article in Imbibe magazine, that amaretto is made by soaking the seeds from the inside of apricots or even peaches in alcohol. i remember when trying it out myself that the seeds looked an awful lot like almonds. and the green almonds at the market looked a lot like very early peaches, green and fuzzy. but what to do with them? further research showed that they are a delicacy in Mediterranean, as they have a very short season, and are often pickled. so, on my way home, i picked up 3/4 lb of the little creatures and, armed with a recipe from here, i got cookin'.


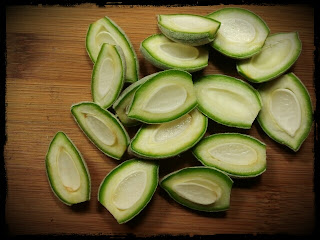
 i sliced them in half and packed them in two 8 oz jam jars and one 4 oz. i also decided to taste one raw and found that they tasted very similar to an unripe peach. they also released a wonderful grassy/squashy smell when they were cut, reminding me of carving a jack o' lantern. plus they were just so pretty, with their bright green inner rim and lemony colored pulp.


 the brine was a bit of a sweet/sour mix. i opted for dried chilis because that was what i had on hand, and threw in a pickling spice blend that i have used for cucumber pickles in the past. i also had to laugh at myself a bit when i saw that the recipe called for raw sugar and found i had not one but two bags in the cabinet. oh the ingredients i keep around...! after adding the hot brine and screwing on the lids, i processed the jars for about 10 minutes in a hot water bath. sadly, the 4 oz jar must have been old and chipped somewhere because it burst in the pot...not as dramatic as it sounds, just a little muffled 'pop!' as the bottom cracked off and released the contents into the water. the other 2 jars were fine and the seals set after they were removed from the bath.

nutcracker squirrel can hardly wait for the almond pickles to cure!
 and now, i wait. at least a week. i'm very excited, as i'm a big fan of homemade pickles of all sorts. i'm also wondering if these might make a nice cocktail garnish, having recently forayed into making my own liqueurs and experimenting with twists on traditional cocktails. i'm also going to keep my eyes open for other unusual seasonal items that i can play with. golly, i sure do love NY!

Wednesday, March 28, 2012

new toy!

anyone who knows me is aware that i am a sucker for a crafting gadget. i tend to be more textile and yarn oriented, never having developed an interest in scrapbooking, but i i have to admit i am often drawn to materials and tools intended for that particular craft. maybe it's because all of those scrapbooking pages look like delicious vintage textiles, or maybe it's just the cleverness of some of the die cutting devices. in any case, i'll sometimes find myself perusing the clearance section of the craft store and on a recent trip, this little creature caught my eye.


it has a very specific purpose. basically, it's for making paper lanterns and these interesting mobile swirly things (is that the technical term...?). i was primarily interested in the lanterns and had seen this device before, but couldn't justify the price. however, on clearance for about $7, i couldn't resist. i also found a large pack of 12" X 12" scrapbooking card stock for about $6 and was thrilled to see the paper size called for to make the lanterns was 6" X 6". i happily took my purchases home and found an exacto knife, pencil and straightedge.


after cutting my paper into quarters, i opened up the box and check out the instructions. the process is really simple, open the hinged template, fold the paper in half print side up, slide it in place, and use the enclosed safety blade (which i managed to prick my finger with by pressing on the guard that i thought was removable...silly crafter...) to cut straight lines along the indent to the fold. the top half inch or so is protected, so there's no chance to cut too close and lose your top and bottom edge. next, unfold and roll the paper into a tube and staple at the top and bottom to close. voila! fancy paper lantern in about 2 minutes!


last of all, i punched holes on either side and threaded some yarn through, looping around each time to secure it in place. i absolutely love them!!! i may get some cool touch string lights and set them in. how pretty would that be for an outdoor party, or indoor one for that matter! so, despite my best friend threatening to put me in a crafty 12 step program (that she freely admits she should probably enroll in herself), i think this purchase was worth it. now i just have to find more dark corners in my apartment that need a little cheering up.